PHOTOGRAMMETRY: HOW TO DO IT
The Arc/k Project has created instructionals to show the basics of photogrammetry and how you – as a citizen scientist – can contribute.
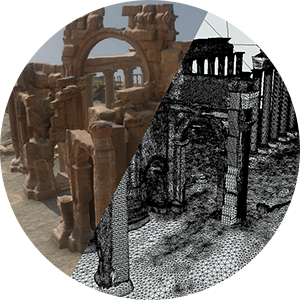
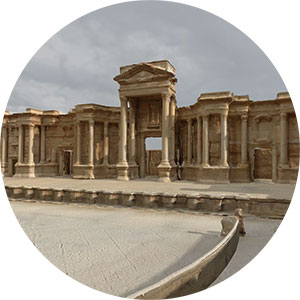
By following these steps, you could be digitally preserving objects, monuments, buildings, and landscapes that might be damaged or destroyed in the future.
We welcome individuals capturing objects or places that they believe are most important to their local community to upload a copy onto our site for archiving, as well as possible 3D model creation of your work.
If you have digital photo collections of important and/or endangered archaeological sites, works or art, ancient cities or other treasures of the ancient world (published on sites like Instagram, Picasa, Flickr, etc.), take a closer look and consider whether they may be used to aid our process of digital archiving in order to create 3D models, thus protecting against complete loss in worst case scenarios.
When examining your photo archives, try to determine whether they were shot with a single lens length (if they were done on a smartphone this is most likely the case). If, however, they were shot with a digital camera you can determine the lens length by going into the metadata which is recorded with each image. By looking at all of the photos in a line you can tell whether they were shot with the same lens length. Photos can be shot at any lens length but having multiple photos shot with the same lens setting is important for each photogrammetry solve.
Not sure your photos are right for the project or need assistance with taking new shots? Send us a description of your photos or experience and we will let you know! We are here to help. Contact us!
Video tutorial on 3D digital capture (photogrammetry)
Presented by The Arc/k Project
In this video tutorial, The Arc/k Project explains the fundamentals of how to shoot a series of photos for later use to create a 3D model of your subject, whether that be an object, monument or building.
– GET STARTED: LEARN THE BASICS –
ALREADY HAVE PHOTOS TO SHARE?
In some cases we can even use pre-existing photos to do photogrammetry on objects and archaeological sites. Look through your photo collections—there may be a lost treasure there just waiting to come alive again.

LEARN HOW TO SHOOT AND UPLOAD NEW PHOTOS!
On this website, you will find the necessary information to teach you the basics of photographing for photogrammetry-based digital reconstruction in 3-D.
– HOW TO SHOOT –
YOUR CAMERA
A camera that shoots sharp images is the best choice. A DSLR camera with 12 megapixels or better is preferred (such as consumer models made by Canon, Nikon, Sony, etc.). Smartphone cameras with correct exposure and no motion blur are acceptable as well, though the higher resolution the camera the better quality of the photogrammetry solve.
USING A LENS
Try to use a Prime lens with a DSLR like a 24mm or 50mm lens with your camera. If using a zoom lens, you must be sure to lock the lens at single setting for the entire series of photos. We would recommend using gaffers tape over the barrel of the lens, to prevent it from shifting.
EXPOSURE
Shooting images with correct exposure is important (try not to clip your darks or your highlights). Make sure your images are sharp, not blurry. Tripods or other bracing to make sure the camera is not moving are ideal, but a steady hand is good enough. Try to achieve even lighting whenever possible, such as when the sky is overcast.
SETTINGS
When shooting with a DSLR, keep your ISO setting as low as possible to avoid a noisy image. Ideal ISO settings are in the range of 250 to 320 (that is, the native ISO of your particular camera) but usable ISO settings on recent models by Canon for example can be as high as 1000 if need be. Try to shoot in manual mode so that all your images of a given subject have the same exposure. RAW image files are best, however JPG images with no compression can also work.
Keep your f-stop settings around f/8 to f/16 for best results (this will generate a larger depth of field). Having everything in focus in your photos is ideal.
IDEAL SURFACES
Avoid shooting surfaces that are mirror-like or completely transparent whenever possible. Also, large areas in an image with no detail such as a white wall are not good. Ideal surfaces are matte with lots of high frequency detail, such as the rock of sculptures, the bark of trees and the bumpiness of stucco walls, etc.
Avoid shooting moving objects.
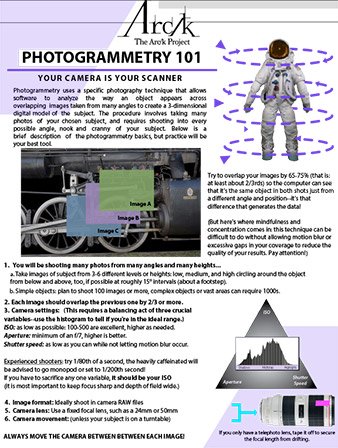
Click the image to view or download our Beginner’s Photogrammetry Cheat Sheet – we’ve provided all of the basics that you need to know to start your own photogrammetry projects!

GET SOCIAL
Sign up to receive updates on our newest models, events we’re attending, new programs, ways to get involved, and more!